A lot of websites use infinite scroll including Facebook&Twitter. There are a lot of Ruby Gems that help in implementing this but it’s rather simple to create your own with Javascript and avoid adding another gem to your app.
Let’s say we have a ul with a id of videos, inside this there are a lot of li tags that contain title’s of videos.
12345678
<ulid="videos"><liclass="video">YouTube Video 1</li><liclass="video">YouTube Video 2</li><liclass="video">YouTube Video 3</li><liclass="video">YouTube Video 4</li><liclass="video">YouTube Video 5</li><!-- more videos --></ul>
We want to detect when a user hit’s the bottom of these videos and make a call to grab more videos.
123456
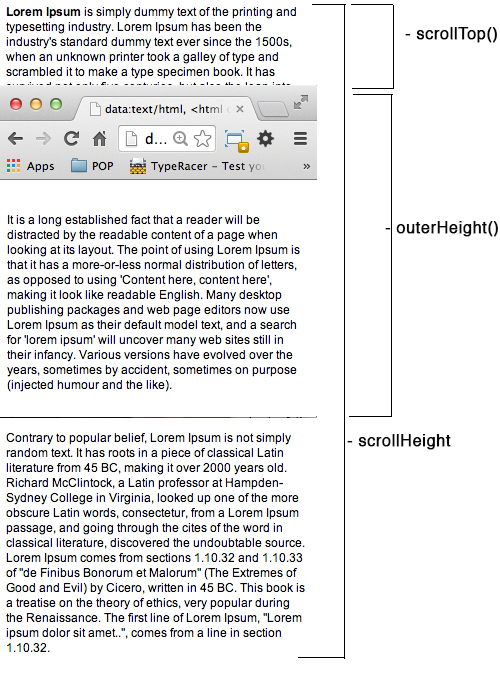
checkVideoScroll = (e) ->element = $(e.currentTarget())ifelement[0].scrollHeight-element.scrollTop()==element.outerHeight()#make call to get more videos$->$(".videos").on("scroll",checkVideoScroll)
When the document loads we set a scroll listener on the list of videos. When a user scrolls down, we call the checkVideoScroll method. On the first line the method assigns element to be the current target, which in this case is the ul.
The scrollHeight is the height of the element including content not visible on the screen. The scrollTop() gets the scroll top offset of the element. The outerHeight() is a jQuery method that returns the visible portion of the scrollable element.
As you can see once the user scrolls all the way to the bottom, scrollHeight - scrollTop() will equal the outerHeight() and that’s when we make a call to get more videos.
As you can see infinite scroll is simple with jQuery.
At times you need the user to check out your application without having to sign up. Play around with the features and if they are interested they can sign up. It’s easy to create a guest record on visit of the page, but the difficult part is in transferring the data from the guest to the signed up user.
Setup
Assuming you have a default devise setup on a user, you need to override the current_user method devise provides out of the box.
First we’ll need to add a guest column to our user model.
Since we use the current_user method in our application, we default to normal behaviour. If there’s none we create a guest_user. The logic is simple,
if the session[:guest_user_id] is nil we create one otherwise we use that id itself.
The create_guest_user method instantiates a user and within a block sets the guest attribute to true. The reason we do that is because guest is not accessible as an attribute and setting it normally would throw a mass assignment error.
You probably have some logic in the navigation bar when going to the homepage, hence the guest user record gets created whenever you make your first reference to current user.
Transferring data to signed up user.
Let’s say the user finds your application beneficial and decides to sign up. Here is the code needed to transfer the information.
We want the new action to be the same, hence we call super. However we are overriding the create action. After saving the user we call move to on the current_user if they are a guest. move_to is a method defined on the user model.
app/models/user.rb
123456789
classUser<ActiveRecord::Base#user logic defmove_to(user)todos.update_all(user_id:user.id)end#more user logicend
In this case we move all the todos to the user who has just signed up. Once that is done we sign_up the user using devise’s built in sign_up method.
You might be thinking about deleting the guest user right now, but you should not in case you have relations dependent to it. You best bet would be to create a cron that deletes the guest user’s every 24 hours.
lib/tasks/scheduler.rake
1234
desc"Remove guest accounts more than a week old."task:guest_cleanup=>:environmentdoUser.where(guest::true).destroy_allend
And there it is, guest users who can interact with your app.
What is Ctags? It’s a tool that creates an index file of functions, variables, class names and so on based on the language. This makes it easy to navigate a code base, and makes you feel like a badass.
At times you come across a method and have no idea where in the source code it is. Imagine with a press of a command it takes you there immediately. You are writing Rails code and want to look at the documentation for let’s say validates, instead of doing a google search just use Ctags! You no longer have to get scared of a large code base.
The setup.
Ctags come shipped in with MacOS but you’ll want the exuberant Ctags.
1
brew install ctags
If you did the installation right, you should get the following output when running ctags --version
Now that we have Ctags installed, go to the root file of your code base and run the following command:
1
ctags -R
The -R is to recurse through the subdirectories. Now there should be a tags file created in the directory. If you are using Git for version control, I recommend putting this in your global gitignore.
Indexing your Ruby Gems.
This is best done through the ruby gem gem-ctags
1
gem install ctags
And then run:
1
gem ctags
This will index all the gems and you won’t have to ever do this again. From now on whenever you install a gem, it will get automatically indexed.
Auto Indexing.
Despite the awesomeness of Ctags you might be thinking you have to always manually index a directory. Whenever you pull code from Github, merge in branches etc. This issue has been solved by the great Tim Pope. The article explains how to setup auto indexing using git hooks. There is one point that I missed out, he says to make the files executable. To do that:
1
chmod +x file_name
You must do this for all the files as he states.
Now any time you pull, merge or commit the tags file will get updated.
However this won’t work yet for existing repositories, you must reinitialize them with git init followed by git ctags
Navigating.
With all that out of the way, on to the fun stuff. Open a file place your cursor on a word. Let’s say you’re in the post class and you see the word User. Navigating to that word and pressing <C-]>“control and close bracket”, will jump you to the User class. You can keep diving deep into the code base with this. At times you can go a bit too deep,the good news is that Vim keeps a history of things. Hit :tags to access that.
1234
 # TO tag         FROM line  in file/text
 1  1 User                6  ~/programming/contractjobs/teen_w/app/models/crons/daily_alerts_email.rb
 2  1 devise              6  app/models/user.rb
 3  1 attr_accessible    10  app/models/user.rb
This is my current list, you can move back and forth between this by <C-o>“control O” and <C-i>“control i”. As you can see I have attr_accessible in my list, this is a method in the rails framework. The one thing I absolutely love about Ctags is that it makes navigating your gems’ source code very easy. My rails knowledge has increased really fast thanks to this. As the say, the best way to improve as a developer is too read other people’s code.
You can prefix the ctag command with a g to get a full list of matches to choose from.
This should be enough to get you started there are a lot of other commands help ctags to find out more.
For Sublime Text users.
For an app I am working on, I needed to create an email account on my domain based on the user’s input. For example the user signed up as ‘johndoe’, I had to create an email for them johndoe@mydomain.com. Initially I thought this would be difficult, but it turned out to be simple thanks to DNSimple.
Attempt#1
After searching stackoverflow for a few hours, I posted a question on asking how can this be done. Thanks to Ludovic who mentioned I can use the API of my host service. I didn’t know it would be that easy and luckily my host service, Namecheap, has an API. I signed up for a key and within 24 hours got access to it. I was able to set up email forwarding, but due to the API being in beta stage there are a few caveats. First the API is only available during specific hours, which wasn’t too bad. However the API was expected to be used through a set IP address and this was a deal breaker. In order to get this up on Heroku meant using the Proximo addon which is too expensive for my budget. I scraped this and starting looking for an easier way.
DNSimple To The Rescue
I had heard a lot of about DNSimple and their ease on managing domain settings. This topic always confuses me, but their brilliant UI and well documented options make it very easy to use. The best part was they have a full featured API which is exactly what I needed. DNSimple comes with a 30day trial, but I signed up for their bronze plan. The request needed to get all email forwards for you app:
This is a get request with the headers notifying that you want a JSON response and a header specifying your email and API token. You can obtain your API token from the account page, don’t confuse this with the domain key that DNSimple provides.
In order to create an email forward, you will need to make a post request:
This time we have an additional header, setting the content-type to be JSON as we will be sending JSON. We also need to specify a post request, which is indicated by -X. Finally we have to send the data with -d. All emails that get sent to john@example.com will be forwarded to someone@example.com.
You can send a post request with headers in a Rails app using the system method(you’ll paste in the same script) but I prefer to make a post request using the HTTParty gem as it’s cleaner. The same post request in ruby:
I have used the likes of Delayed Jobs and Sidekiq in previous apps, but for an app I am working on I had to create cron jobs based on user settings. I needed someway to iterate over the user’s settings and create the crons needed. I came across the whenever gem that makes it easy to create cron jobs. With a little tweaking I was able to create cron jobs based on a user’s setting.
Gem installation
In your Gemfile:
1
gem'whenever',require:false
The reason we add require false is because whenever creates cron jobs outside of the rails app.
Next run the following command from the root of your app:
1
bundleexecwheneverize
This will create a schedule.rb in the config file, this is where your logic for setting up crons will be. You can have a look at this railscasts on how to setup crons.
Requiring the rails app
In order to have access to your models inside the file, you need to require the application. This can be done with the following line.
reminder_frequency can contain for example: “sunday” or “weekday” reminder_time contains the timestamp: “6:00pm”
This will create the cron jobs for every user.
Running the following command will confirm that:
1
bundle exec whenever
There are many different solutions out there for scheduled jobs, whenever makes it really easy with it’s syntax and simplicity.
Let me know if you have any questions.
Receiving email in a Rails app can be tricky. The Action Mailer library has minimal support for this and it can be quite tricky. This is where SendGrid’s parse API comes in along with the gem released by ThoughtBot called Griddler.
Setup
Start of by adding the griddler gem to your gemfile.
1
gem "griddler"
Followed by a bundle install. If you run rake routes, you will see Griddler has created a route to receive mails on.
If you need to edit this route, you can paste it in your routes file.
config/routes.rb
1
post'/email_processor'=>'griddler/emails#create'
By default Griddler will look for an EmailProcessor class. You can create one in the models folder.
app/models/email_processor.rb
12345
classEmailProcessordefself.process(email)#create models, process reports etc.endend
These are the following attributes available on the email received.
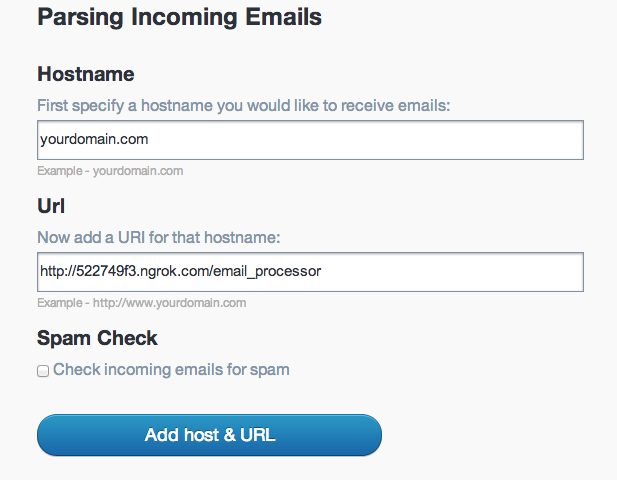
For my app I ended up using SendGrid, which has an add-on for Heroku. Once your account is setup, go the parse webhook settings page.
In order for this to work you need a domain name. Your site doesn’t necessarily have to be deployed on it. Enter the domain you are going to use in the domain field. For the URI enter the route where you want to receive mails. I have used Ngrok as I wanted to test it in development.
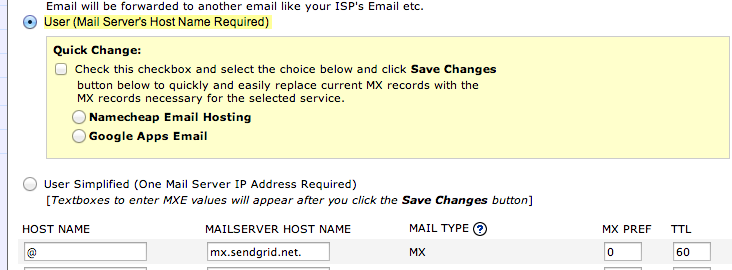
The last part needed in order to receive emails is to point your domain’s MX record to, in this case, mx.sendgrid.net.
What is a MX record?
The full form is Mail Exchanger record. It specifies how email should be routed for a particular domain. It specifies a mail server, in this case sendgrid, for accepting emails for your domain.
Go to your domain settings and create a MX record which points to mx.sendgrid.net. An example for Namecheap would look like this.
You will also need to setup an email for your domain, by default namecheap creates an info@yourdomain.com.
And that’s it! Start your rails server along with ngrok or a localtunnel. Give it a go send an email to the address you created in the domain settings.
In my case this would be info@shivamdaryanani.com and boom you should have received a post message from Sendgrid. You would want to put a debugger inside the method to play around with email object that Griddler gives you.
The SendGrid API expects a 200 response from your endpoint. If it doesn’t get it or if your site is down, it tries up to 3 times in set intervals until it reaches your app. Which is great if your site is under maintenance.
Why would I want to receive email?
That’s a good question. A lot of sites create their support tickets in this way. Once you email support@domain.com, it parses the email and creates the ticket. Also here is a list of creative ideas:
Often when creating a web application there comes a time where two models are related and you want to create one form where you can add both the attributes. Let’s say you have a topic model which has many questions, and you want to create the topic and questions for it in one form. Rails makes this easy with the accepts_nested_attributes_for method.
Accepts nested attributes is just a shortcut, it defines a dynamic attribute {field_name}_attributes so you can automatically assign them to an association. The allow destroy lets you destroy question objects in this case through the form, it is set to false from the start. There are other methods you can use with this, such as reject_if, limit and update_only. More information can be found from the source.
Form
1234567891011121314151617
<%= form_for @topic do |f| %> <div id="name"class="field"><%= f.text_field :name, placeholder: "Name" %> </div> <div id="questions"class="field"><%= f.fields_for :questions do |builder| %> <div class="question"><%= builder.text_field :content, placeholder: "Question" %> </div> <% end %> </div> <%=f.submit"Create topic"%><% end %>
This creates a simple form which allows you to create a topic with a name and add one question to it.
Controller & Routes
The controller method for create is your regular create method, nothing fancy. That’s why I love Rails.
app/controllers/topics_controller.rb
12345678910111213141516171819202122
classTopicsController<ApplicationControllerdefnew@topic=Topic.new@question=@topic.questions.buildenddefcreate@topic=Topic.new(topic_params)unless@topic.saverender:newelseredirect_toroot_path,notice:"Successfully created a topic"endendprivatedeftopic_paramsparams.require(:topic).permit(:name,questions_attributes:[:content])endend
The new method creates the instances for both topic and questions. In the create action we instantiate a topic passing in a method. This is a private method needed in Rails 4 to make sure only the allowed attributes are used. We require the topic parameters and permit the name for a topic and the questions_attributes. Now all we need are the routes and this will work.
config/routes.rb
1
resources:topics
Now we have a simple version of adding questions to a topic, but we still don’t have validations.
Validations
It is good practice to have your validations on both the database level and on the Rails model’s itself. The validation for the association is not as straightforward as it seems. A common approach would look like this.
These are simple validations that would normally pass but they won’t because of the nested forms. You need to tell Rails that the two model relations describe the same relationship but from the opposite direction. Rails provides a method for this, inverse_of. Rails has a method for everything.
Since Facebook has rolled out realtime updates it has been easier to gather information. Instead of hitting the API on a set time interval, we can just wait for Facebook to ping us and go grab the information we need. This all sounds good in theory but as I had to integrate realtime updates for an application I am working on, there were quite a few pitfalls and I wish I knew some of these before hand.
Setting up a Facebook application
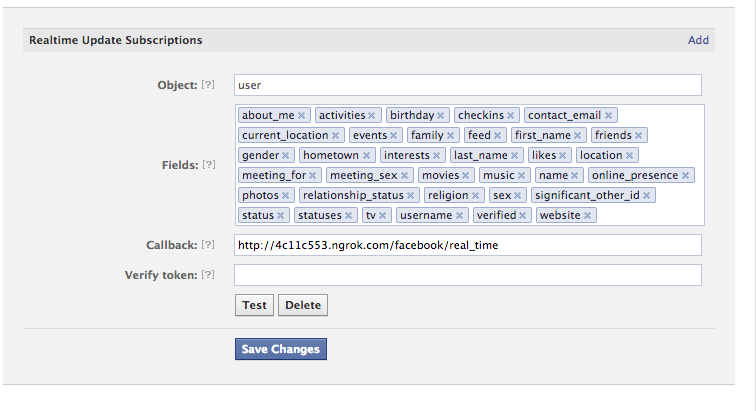
I am not going to walk you through creating a Facebook application, Ryan Bates already does a good job with it. Once you have that setup and the permissions you need for this application head over to your Facebook applications dashboard. Over here select the application in which you would like to enable realtime updates and hit the edit button on the top right. This should take you to a page with the basic information of your application, and on the right under settings there should be ‘realtime updates’.
As you can see I have a user object and the fields I want to follow. I have selected all the fields for the demo. You should only select the fields your app has permissions for, otherwise it would be pointless as you won’t be able to get the information.
For the callback URL you should point it to the route of the realtime action, but you must be thinking how will I test this locally? That’s where Ngrok comes in. Ngrok creates a tunnel from the public internet to a port on your local machine. This is perfect for a situation like this where Facebook has to verify that you are authorized.
The information on the site is self explanatory, once installed have it listen to the same port as your server.
123
rails s -p 3000
# on a different Terminal windowpath/to/ngrok 3000
Ngrok will give you a URL which you can paste in to the callback section followed by the route to the realtime action. For the verify token any random string will do.
Setting up the controller
Now create a facebook controller with the real_time method.
app/controllers/facebook_controller.rb
1234567891011
defreal_timeifrequest.method=="GET"ifparams['hub.mode']=='subscribe'&¶ms['hub.verify_token']=='stringToken'render:text=>params['hub.challenge']elserender:text=>'Failed to authorize facebook challenge request'endelsifrequest.method=="POST"#do stuff with information endend
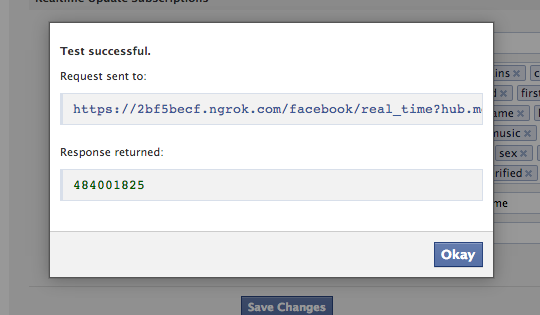
Now that we have the route set up for both GET&POST, when we click on test on the realtime updates page Facebook will make a get request to this route ensuring we are authorized. The default hub.mode set by Facebook is subscribe and you must make sure that the verify_token matches what you have entered on Facebook. If all went well Facebook will prompt you with the following message:
And we are done…not really.
Your application is running, realtime updates are setup and you have a test account to play around with. On every change the user makes to the field you have subscribed to, Facebook will ping your servers. However it will only do so with the Facebook ID, the fields that have changed and a timestamp. This means that we still have to query the API and this can be quite a pain when it comes to things like comments or photos. The good thing is I have banged my head on this for the past week and should be able to alleviate a lot of your troubles.
Facebook example response for relationship change:
Now in order to actually grab the change we have to make a call to the Facebook API requesting this information. You will only be able to get this information if you have the right permissions.
12
#you'll need the HTTParty gemHTTParty.get("https://graph.facebook.com/#{uid}?fields=relationship_status&access_token="+auth_token)
This gives the information for the relationship status. This seems and is straight forward and these are the building pieces for every change. However there are some caveats. Below are snippets in order to get events,friends,posts,photos&comments.
And the query to get all friend’s related information:
12345
#token is the user's auth tokenfriends=HTTParty.get("https://graph.facebook.com/"+uid+"/friends?access_token="+token+"&fields=birthday,age_range,gender,first_name,last_name,name,id").parsed_response["data"]friends.eachdo|friend|friend_data=HTTParty.get("https://graph.facebook.com/"+friend["id"]+"?access_token="+token+"&fields=about,age_range,birthday,link,bio,events,gender,interested_in,location,name,relationship_status,significant_other,first_name,interested_in,last_name,locale,location,username,family,likes,locations,movies,picture,photos,posts,security_settings").parsed_responseend
Posts,Photos&Comments
Now this is where things start to get complicated. As you can see Facebook sends ‘feed’ as a changed field with every column.With every change to anything on Facebook it needs to update the feed and in order to get the photos,posts and comments we must query the feed or stream in the Facebook Query Language. Despite being able to get posts on the ‘status’ changed field and photos on the ‘photos’ changed field, I found it best to look for the feed change and make a query.
One great thing with the Facebook Query Language is that you can add conditions to your queries.When making a query after a realtime update, you can put a conditional for updated time to be just before the timestamp given by Facebook.That’s what I thought too, but after a lot of digging Facebook doesn’t give you the right information. The only way around this is to get all the posts, sort them by updated time and then use ruby’s built in methods to select the posts before a certain time.
Facebook example response for feed:
12
#as you can see it gives us the time{"object"=>"user","entry"=>[{"uid"=>"100928374283421","id"=>"100928374283421","time"=>1383426584,"changed_fields"=>["feed"]}],"facebook"=>{"object"=>"user","entry"=>[{"uid"=>"100928374283421","id"=>"100928374283421","time"=>1383426584,"changed_fields"=>["feed"]}]}}
And the query to get the latest posts:
123
latest_posts=FbGraph::Query.new("SELECT comment_info,post_id,message,actor_id,attachment,is_hidden,like_info,message_tags,permalink,privacy,created_time,updated_time,share_count,target_id,type,with_tags from stream WHERE source_id=me() and (message or attachment) ORDER BY updated_time DESC LIMIT 100").fetch(access_token:token)posts=latest_posts.select{|post|post["updated_time"]>(time-30)}.select{|post|post["message"].present?||post["attachment"]["media"]}
What’s going on here? In the first query, I find all the posts of the user limit them to 100, order them by updated time and make sure that either message or attachment(photo) is present. In the next line I take only the posts that have an updated time 30 seconds(approximate time it takes Facebook to ping your servers) before the timestamp. And select the ones that either have a message or photos. Now we have a bunch of posts, time to decipher whether it is a status update, photo or comment.
12345678
#posts from the previous codeblock posts.each|post|ifpost["message"].present?#create postelsifpost["attachment"]&&post["attachment"]["media"]#create photo with post["attachment"]["media"] passed as a parameterendend
The post is fairly simple from here, we already have the attributes we need. Now in order to get comments for post, we can do the following query:
12
#you can sort by time if needed comments=FbGraph::Query.new("SELECT id, user_likes, text, post_id, fromid, likes, time FROM comment WHERE post_id = '#{post_id}' ").fetch(access_token:token)
The use case for me is to update all the comments for the posts and add the new ones, hence I query for all of them. Facebook gives you the flexibility with the query language for any use case possible. Posts,and comments done and now time for photos.
After rigourous testing, Facebook gives only 9 photos. Let’s say a user added an album, added 50 photos to this with normal queries that I am about to display Facebook will only give 9 photos back. The worst part is there’s no way to decipher if there are more photos. One trick I found is, if Facebook gives you 9 photos that means there are more photos. Hence I find all the photos in the album.
1234567891011
#for each post from the previous block that has attachmentsphoto_ids=post.map{|i|i["photo"]["fbid"]}ifphoto_ids.count==9# get data for first photoid=photo_ids.firstphoto_data=HTTParty.get("https://graph.facebook.com/#{id}?access_token=#{user.auth_token}")#parse album ID and get all photo id's for that albumalbum_id=photo_data["link"].match(/(a\.)([^\.]+)/)[-1]response=HTTParty.get("https://graph.facebook.com/#{album_id}/photos?fields=id&access_token=#{user.auth_token}")photo_ids=response.parsed_response["data"].map{|i|i["id"]}end
I get the photo_ids from the first line, and if there are 9 which means more photos I get all photo IDs from the album.
Iterating over all the photo ID’s to get the related informaton:
123456789
photo_ids.eachdo|id|photo_data=HTTParty.get("https://graph.facebook.com/#{id}?access_token=#{user.auth_token}")#and for comments ifphoto_data.has_key?("comments")photo_data["comments"]["data"].eachdo|comment|#use comment informationendendend
As you can see there’s a lot of edge cases here, so you must test thoroughly. Both manually and with automated tests. One good thing about the photo query is that it gives you comment information too. The following takes care of status updates, comments on them, photos posted on the wall, comments to those and if the user posts an album. The only part I haven’t been able to get is realtime comment on a photo which is inside an album. I am currently working on that, and will update this post if I find a way.
Wrapping it all up.
Despite it’s limitations Facebook has done a great job with the realtime updates and Facebook Query Language. I can’t stress this point enough, test thoroughly. Manually and with automated testing such as Rspec. I have written tests for this and might showcase it in a later blog post. Whenever you get stuck, instead of searching StackOverflow which at times can help, the best approach I found is to use the Graph Explorer.
Hope that was useful, let me know if you have any questions.
Been working on a side project with a friend and we were at the point where we needed to build an API for the code we had written. The idea was to build an API which can be accessed by our customers with an API key.
After some research, I found couple of gems that make it easy to do this. Rocket Pants and Versionist. In order to reduce the dependencies, I decided to build it myself with the help of RailsCasts.
This setup gives us the ability to easily add new versions of the API while maintaining backwards compatibility. The only thing is that the API is not secure.
Securing the API.
There are a few ways you can do this. Instead of doing it with OAuth I just created an access token given to each application created. The access token is created using a SecureRandom.hex string.
app/models/user.rb
12345
classUser<ActiveRecord::Base#code for authentication has_many:applicationsend
The way I set this up is that a user can have many applications, and each application belongs to a user. Before an application is created there is a unique key which is generated restricing access to the API.
There are other columns you can add to the model if needed such as permissions, expires_at etc.
app/controllers/api/v1/search_controller.rb
12345678910111213141516171819
moduleApimoduleV1classSearchController<ApplicationControllerbefore_filter:restrict_accessdefyoutube#code that searches for youtube videosendprivatedefrestrict_accessapp=Application.find_by_access_token(params[:access_token])head:unauthorizedunlessappendendendend
Updating the controller in order to send an unauthorized response if the access key is invalid. Now in order to make a request the user has to send in the right access_token in the parameters. Also make sure to not make the access_token field accessible using attr_accessible or in rails 4 you can do the following:
app/controllers/applications.rb
123456789101112131415
classApplicationsController<ApplicationController#code for controllerdefcreate@application=current_user.applications.build(application_params)#code to save applicationendprivatedefapplication_paramsparams.require(:application).permit(:name)endend
Instead of directly passing in the params[:application] we pass the build method a method itself. This private method makes sure to only permit the application name.
Since the output of my controllers were already in JSON there was no need for RABL. Also for those looking for something lightweight can have a look at Rails-API. This is enough to get you started if you any questions leave comments and I shall address them.
A client just asked me, how many lines of code is the project?
Despite being an absurd question, and having no relation with the project at all this made me really curious to find out.
After a quick web search, I stumbled upon this piece of code (Bare in find this is for a rails app).
1
find ./app -type f | xargs cat | wc -l
What does this code do?
1
find
is a shell method that searches through the files.
The next part,
1
./app -type f
searches the app directory. You can search any directory you want, this looks at the app directory which in a rails app holds majority of the code you write.
After that you list the type you want. If you search without the type you get both directories and files. In this case we just want files, hence the “f”. This is an alias for “file”.
1
| xargs
We need to use xargs over here which reads the STDIN stream data and coverts each line into space separated arguments to the command.
1
cat |
reads the output and pipes it out to the next step of commands
1
wc -l
“wc” is short for word count. This gives 3 results. The first being the number of new lines, the second being the number of words and last the number of characters. However we are interested in the lines, hence the command “-l”.
This is a cool little script to get an overview of the size of the codebase.